by Mark Humpage | Aug 15, 2011
Credit: Mark Humpage
What is it? – The International Space Station or ISS is a large spacecraft which orbits around Earth. This orbit allows the ISS to be reached by launch vehicles (such as the Space Shuttle) of all the international partners for the delivery of crews and supplies. It is the largest and most complex international scientific project in history. The ISS is the size of a football pitch fitted with almost an acre of solar panels that provide electrical power to six state-of-the-art laboratories.
Can the ISS be seen from Earth? – Yes, it travels at an amazing 17,000 mph and orbits earth at an altitude of approximately 250 miles. The sheer size of the structure and array of solar panels reflect sunlight, making it the biggest, brightest object orbiting earth. Only the sun and moon are brighter. It can easily be seen moving across the night sky, at certain times, almost resembling a slow moving fireball.
How do you capture it on camera? – With a bit of planning and the right equipment it can easily be captured on camera:-
Planning – Firstly, one needs to calculate at what time the ISS will pass over the skies above. This can easily be found by visiting a website: www.heavens-above.com which will identify the exact days and times at when the ISS will pass directly above one’s location, and which part of the sky to look. There are also a number of excellent mobile applications such as ‘GoSatWatch’ and ‘Flyby’ which allow this to be done remotely.

Credit: Mark Humpage
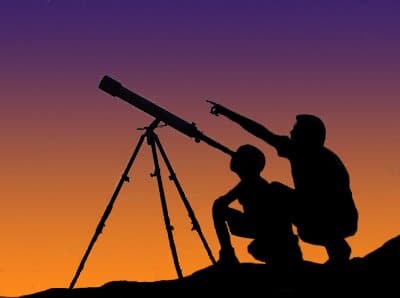
Execution – A good ISS capture will require a long exposure. A tripod is therefore required to keep the camera nice and steady. A wide angle lens will ensure maximising as much of the ISS flyby which can travel across the entire horizon. Personally, I use the Olympus 7-14mm or 8mm fisheye which are ideal lenses. Try to locate a foreground object of interest within the frame, a line of trees or buildings in order to give the image perspective and scale. Set the camera to manual and use long exposure times of anything between 15 and 30 seconds. With camera primed and in position all that is left now is to wait for the ISS to enter the field of view. By capturing a single or number of continuous exposures the resulting image(s) will reveal a long trail across the frame. Capturing numerous and continuous images will allow you to stack and produce a composite, which can produce stunning results.
ISS Double flyby photo (bottom) – For this ISS double flyby image I chose a location that offered a good foreground subject (water) and scope to cover the entire east/west horizon. Planning involved choosing an evening where the ISS would fly over my location numerous times (in one night) and a look at the weather forecast to ensure clear skies. Armed with a one man tent and all my camera gear I headed off and arrived on site late evening on June 11th. The first ISS pass was due at 2300hrs and subsequent passes every 90 mins. The plan was twofold 1) Set up one camera waterside and take continuous 15sec exposures for the entire night 2) Use a second camera for each ISS pass in different locations at the site. In between passes I would grab a short power nap huddled in the tent. Not a very comfortable evening but the resulting images made up for it. Using stacking software I produced two composite images, one detailing the ISS passes alone and the other including a star trail from the entire evening.
The star trails and bright light (moon) is the resulting visible effect of earth’s rotation. The location choice was also perfect as the morning mist makes for an eerie scene, perfectly complementing the ISS pass. The images made the national press the following day, which was very pleasing. One final word about capturing the ISS – it is due to be decommissioned (crashed into the sea) in 2020, so be quick!

Captured with Olympus E5 & 8mm fisheye – 2 ISS flybys, each comprising approx 12 images. Final stacked composite Credit: Mark Humpage

by Mark Humpage | Aug 10, 2011
Credit: Mark Humpage
Meteor Watch, 2011. Well it’s that time of the year again. The air is warm, days are long, Noctilucent are departing, which can mean only one thing – Meteorwatch is back.
There are many subjects within our night sky that are fascinating to watch and equally challenging to capture on camera. However, there really is something quite exciting and magical about spotting balls of fire streaking across a star filled sky. Maybe my affinity with severe weather and, in particular, lightning was the catalyst for fascination, or perhaps the fact that objects the size of a grain of sand can ironically put on such a grand fireworks display. History, in the form of a meteor shower 200 years ago is said to have inspired Samuel Taylor Coleridge’s lines from his famous poem The Rime of the Ancient Mariner. It’s amazing to think that distant evening, when Coleridge was walking along the Somerset coast witnessing the upper air burst into life, would inspire others as we once again prepare for showers.
Whilst there are many displays throughout the year, the most visible meteor shower is the Perseids which light up the skies around mid August each year and offer peak shows of more than 1 meteor every minute – a perfect viewing event. The moon cycle can invariably weaken the viewing event (depending on phase) but even so the challenge of course is not necessarily to witness but to capture on camera. With this in mind, let us look at some useful pointers which will help camera owners increase their odds of pulling off a meteoric masterpiece over the coming weeks.

Credit: Mark Humpage
Firstly, what Camera Equipment is required? Let’s not pull any punches. To capture a decent meteor image will require a good quality camera. Shooting a subject in low light or darkness will require a camera that allows full manual control of the settings and interchangeable lenses. In this respect a dslr fits the bill perfectly. Talking of lenses, my ideal selection would a choice of two (or both). A wide angle, something in the range of *7-14mm (14-28mm 35mm equivalent) together with a lens to get a bit closer, such as the *12-60mm (24-120mm 35mm equivalent). I’ll talk about why I suggest these two lenses a bit later within the technique section. Another pre-requisite piece of equipment is a tripod. This will give stability for those long exposures, and prevent motion blurring. Finally, I would recommend using a cable release or remote method of triggering the camera shutter. Combined with a tripod for steadying this will minimise camera vibration – you would be surprised how much vibration is created by simply pressing the shutter release button with your finger!
Camera Settings – It’s important not to forget our camera subject which is essentially a fast moving bright object visible for a very short period of time. Successfully capturing a meteor with a short exposure time, in darkness, is near on impossible because timing will be down to luck (extremely low odds) and the foreground (for wide angle shots) will be too dark. In this respect, and to increase our odds of a successful capture we need to use a long exposure time. To do this firstly set the camera to manual mode (M). Now set the exposure time to between 15s and 30s (15s for continuous and 30s for single shooting – I will explain this more in the technique section) and shutter speed to the lowest setting (a good quality lens should get down to F2.8). Set the ISO to 500. This will be good starting point for most cameras. Bear in mind that camera systems and models vary tremendously depending on the technology inside, such as the sensor and processing engine. Personally, I have found 15s-30s is sufficient to capture the duration of a single meteor. Combined with a mid value ISO of around 500 will provide sufficient light to deliver a pleasing image of both foreground and subject whilst keeping noise (grainy effect) to a minimum.
Camera Technique. I must reinforce the fact there is a great element of luck in capturing a meteor on camera. One can advise on the optimum camera equipment and settings but there is never any guarantee of success. The key is not success but rather improving ones odds of success. I can certainly increase your odds and results by using the following techniques, based around lens choice. Firstly and desirably find a location away from populated areas and light pollution. Set up the camera with a Wide Angle Lens and try to position an on object in the foreground, such as a tree or man made structure. This will add perspective or scale to an image. Position the camera/lens to cover the north east skyline keeping a small portion of land in the bottom third or quarter of the frame. Ensure focus is set manually to infinity. Using a 15s exposure time and remote cable (set to lock) pop the camera into sequence shooting and hit the shutter release button (If you don’t have a remote cable simply keep the finger pressed on the shutter release button, although it will get numb quickly!). This effectively primes the camera to take continuous frames until you switch the camera off (or the battery runs out). What you will end up with here is as many (or little) images as desired and which can be imported into stacking software. A final composite image could be as long as the night combining a star trail effect with hopefully a meteor or two. If using this technique a good tip, to improve composition, is choose a foreground subject with something of interest and paint it with light. This can be done simply by setting off a few rounds of flash remotely whilst the camera is shooting or waving a lit torch around the foreground.
Pros – Excellent success rate of meteor capture with good image composition.
Cons – Captured meteors will appear small, with little detail against a wide angle frame.
The second technique involves using a lens with greater focal length or Zoom. The far end of a mid level zoom range would suffice (60mm or 120mm 35mm equivalent) or, if available, a high end zoom lens allowing anything up to 200/300mm (400/600mm 35mm equivalent).
Once again manually set the focus to infinity and use a 30s exposure time. Train the camera/lens on an area of sky alone and fire away as and when you feel. To start, concentrate on an area of north-east sky near the Perseids radiant (see Perseids section) but do vary the location all around the sky.
Pros – Captured meteors will fill the frame with great detail (and colour).
Cons – Low success rate of meteor capture (due to small area of sky concentration)
In addition, do experiment by adopting the 15s continuous shooting technique with a zoom lens. This will also increase capture odds. Personally, I shoot with two cameras using both these techniques to really maximise the odds of capture, composition and detail.
The Perseids are meteors which appear to originate from a point within the constellation of Perseus in the north-eastern sky. This point, known as the shower’s radiant is a good starting point for aiming the camera lens. Do note that one might see a meteor anywhere in the sky but the direction of motion, when traced back, will point to the radiant. A meteor that does not point back to the known radiant for a given shower is not considered part of that shower. Locating the Perseids’ radiant is very simple and situated in the constellation Perseus, just below the familiar ‘W’ of the constellation of Cassiopeia.
Finally, it is worth making a quick point about Iridium Flares. Sometimes it is hard to tell the difference between an Iridium flare and a meteor. (See top photo). Iridium Flares are common communication satellites which illuminate when the sun reflects off their bright antennas. Usually the brightness, colour and trajectory are a giveaway (noticeably brighter in the center and dimmer at its ends). Iridium flares can also be accurately predicted (http://www.heavens-above.com) and which is the best indicator for confirming, as long as you note the time, direction and elevation.
May all you showers light up!
Mark Humpage July 2011
* based upon Olympus E-system 4/3 sensor camera

Credit: Mark Humpage