Originally posted on Dark Sky Diary as “Perseids Meteor Shower 2011” by Steve Owens @darkskyman on twitter
This month sees the most reliable meteor shower of the year; the Perseids. You can begin watching for Perseid meteors now, and the shower will last until mid-August, but the peak of the shower occurs in the small hours of Saturday 13 August 2011.
Perseus under dark skies
Perseus under moonlit skies
Unfortunately this year’s shower will be obscured by the full Moon which occurs on the same day, and so it won’t present its usual excellent display.
The number of meteors that you will observe every hour depends on a number of factors:
the density of the cloud of dust that the Earth is moving through, that is causing the shower in the first place;
the height above the horizon of the radiant of the shower, the point from which the meteors appear to radiate;
the fraction of your sky that is obscured by cloud;
the naked-eye limiting magnitude of the sky, that is a measure of the faintest object you can see.
Please visit Dark Sky Diary for the rest of this article………..
Everyone is welcome to join in, whether they are an astronomer, have a slight interest in the night sky or just wonder?
As well as looking up, enjoying the night sky with us and seeing meteors, maybe for the first time? You will have the opportunity to contribute for fun with images and online, or to Scienceif you wish, by tweeting and seeing your results on a map, or by submitting Observing Forms if you are a more serious observer.
This event follows on from the popular Twitter Meteorwatchheld in August and December of 2009 and 2010 “Meteorwatch 2009”
Use the hash tag: #Meteorwatch and get involved, ask questions, do some science, follow the event and enjoy the wonders of the night sky with us. Images and other information will be tweeted as it happens. Live!
The highlight of the summer meteor showers: The Perseids reach maximum around the 12th/ 13th of August and may put on a display of approximately 80 to 100 meteors per hour under ideal viewing conditions.
Conditions this year aren’t ideal due to there being a full moon, but the brighter meteors will be seen. Let’s hope the skies stay clear.
Perseid meteors are often bright with persistent trails which can linger for a while after the meteor has burned up. Further information on the Perseid meteor shower and how to view it, can be found here.
While you are looking formeteors, there will be other objects to look out for such as the Planet Jupiter late in the evening, the Milky Way, Summer Triangle, manmade Satellites and more.
The Twitter Meteorwatch will start at 21.00 BST on the 11th of August and will continue through to the evening of the 13th. Amateur and professional astronomers and stargazers from the US and other countries are invited to join in and take over from the UK, when the sun comes up here, helping make the event run continuously and be truly international.
This evening I decided to try some iPhone astrophotography. This blog post will let you see how I got on, and give you the info you need to get started yourself.
While the iPhone 4 camera is far from ideal for astrophotography (the sensor is small compared with a DSLR; in fact it’s not even as good as most point and shoot cameras) it does have one distinct advantage – it’s usually very much to hand, just in my pocket in fact.
There are two kinds of astrophotography you can do with an iPhone: with and without a telescope. The former is called afocal astrophotography, but it is the latter that I tried out tonight: just using the iPhone camera, some extra hardware, a 59p app, and a clear sky.
Afocal Astrophotography. Simply hold the camera to the eyepiece of a telescope (or binoculars) and snap a picture of whatever is in the field of view. For this you can just use the standard camera app on the phone to snap a picture, and it’ll use software to ensure that the image is exposed correctly (although this might not always work). I’ve tried this once before, using the Moon as my target, with decent enough results:
Pic of the moon taken on my iPhone 3GS held to the eyepiece of my 110mm TAL-1 telescope
You can also buy several apps that claim to allow you to take longer exposures, even letting you use a bulb setting (this isn’t actually possible with the iPhone shutter hardware – each of these apps is actually using a clever software work around, but you’re not getting a true 60 second exposure when you set your “shutter speed’ for 60 seconds).
The apps that I use are:
Slow Shutter Cam: has shutter speeds of 0.5, 1, 2, 4, 8, 15? and a B (bulb) setting, plus a crucial self timer delay to prevent wobble when pushing the “button” to take the shot (£0.59 on iTunes App Store)
Magic Shutter: has shutter speeds of 1, 2, 4, 8, 15, 30 and 60? and a B (bulb) setting, but no self timer (£1.79 on iTunes App Store)
Both of these apps have a variety of software setting to allow you to get the best picture; tonight I used Magic Shutter with a 60s shutter speed.
(These apps might allow you to take better images while the camera is mounted to a telescope, but I haven’t tried this yet. Watch this space for test of this later in the year.)
Afocal Astrophotography Hardware
The main obstacle to taking long exposure shots with the iPhone (apart from the fact that the hardware won’t actually let you!) is that you need to make sure that the iPhone doesn’t move at all during the duration of the exposure, so holding it in place with your hand isn’t an option. Luckily there’s a great gadget available from a company call Magnilux. The device is called the Magnilux MX-1 Telescope Adaptor, which allows you to attach your iPhone to any telescope eyepiece. It also doubles as a tripod adaptor.
Magnilux MX-1 Telescope Adaptor
Magnilux MX-1 Telescope Adaptor with iPhone 4 attached (works with any iPhone model)
Magnilux MX-1 Telescope Adaptor configured as a tripod mount
Astrophotography Without a Telescope
Tonight I didn’t connect my iPhone to my telescope since my target, the International Space Station (ISS), moves so quickly and travels across such a large part of the sky that you need as wide a field as possible to catch it.
To capture the ISS you need a long exposure (use Magic Shutter app – see above). The pass tonight lasted 4’19?, and traveled 90° through the sky (from 254° WSW to 164° SSE). The iPhone 4 camera field of view is only 60.8° so I couldn’t capture the whole pass. Instead I decided to try to capture a 60s exposure as the ISS rose to its highest and brightest, at 206° (SSW).
With a 60? exposure, of course, I had to have my iPhone mounted to a tripod. I could have used the Magnilux MX-1 Adaptor set up for tripod mode (see above) but instead I opted to use my new Kungl iPhone case with built in tripod thread, which I attached directly to my tripod.
Kungl iPhone Case
This held the iPhone still, and using the Magic Shutter app set to 60? exposure I managed to get this image:
The ISS passing over, iPhone 4 Camera, Magic Shutter App set for 60″ exposure, 2344, 23 June 2011
Far from ideal, but not bad given (a) it was my first attempt, (b) I had one chance to take the image before the ISS faded from view, (c) the sky was very bright (this was taken at 2344 on 23 June 2011, just after midsummer, with the sky just out of civil twilight), (d) cars kept driving past (note the light art in the foreground!).
Once the sky darkens again later in the year I hope to test this set up under a truly dark sky to see whether it can pick up sharp star images. I suspect that might be tricky!
If anyone else has tried iPhone Astrophotography please let me know in the comments.
I took this image of the Solstice Sunset near my home in the UK last year, it was an amazing experience watching the sun sink below the horizon on the longest day.
Will we be lucky enough to be able to witness this wonder again this year and see some more great images?
Tonight (actually around 0130 tomorrow morning) the Full Moon will reach its highest point due south, just an hour and a half after the eclipse ends. Despite being at its highest in the sky, you’ll still struggle to see it, as it is very low down. In fact the Full Moon nearest the Summer Solstice is the lowest Full Moon of the Year
First, let’s begin with the definition of “Full Moon”. A Full Moon occurs when the Moon is diametrically opposite the Sun, as seen from the Earth. In this configuration, the entire lit hemisphere of the Moon’s surface is visible from Earth, which is what makes it “Full”. There is an actual instant of the exactly Full Moon, that is the exact instant that the Moon is directly opposite the Sun. Therefore when you see timings listed for the Full Moon they will usually include the exact time (hh:mm) that the Moon is 180° round from the Sun (we call this point opposition). Here’s a list of the times of all Full Moons between June 2011 and June 2012:
Month
Date of Full Moon
Time of Full Moon (UT)
June 2011
15 June
2014*
July 2011
15 July
0640*
August 2011
13 August
1857*
September 2011
12 September
0927*
October 2011
12 October
0206*
November 2011
10 November
2016
December 2011
10 December
1436
January 2012
09 January
0730
February 2012
07 February
2154
March 2012
08 March
0939
April 2012
06 April
1919*
May 2012
06 May
0335*
June 2012
04 June
1112*
* UK observers should add on one hour for BST As you can see from this table, the instant of the Full Moon can occur at any time of day, even in the daytime when the Moon is below the horizon. So most often when we see a “Full Moon” in the sky it is not exactly full, it is a little bit less than full, being a few hours ahead or behind the instant of the Full Moon. I’ll refer to this with “” marks, to distinguish this from the instant of the Full Moon (they look virtually identical in the sky). The Moon rises and sets, like the Sun does, rising towards the east and setting towards the west, reaching its highest point due south around midnight (although not exactly at midnight, just like the Sun does not usually reach its highest point exactly at noon). And like with the Sun the maximum distance above the horizon of the “Full Moon” varies over the year. The Sun is at its highest due south around noon on the Summer Solstice (20 or 21 June) and at its lowest due south around noon on the Winter Solstice (21 or 22 Dec) (of course the Sun is often lower than this, as it rises and sets, but we’re talking here about the lowest high point at mid-day, i.e. the day of the year in which, when the Sun is at its highest point that day, that height is lowest…) And because Full Moons occur when the Moon is directly opposite the Sun, you can imagine the Moon and Sun as sitting on either sides of a celestial see-saw: on the day when the Sun is highest in the middle of the day (in Summer), the Moon is at its lowest high point at midnight; and on the day when the Sun is at its lowest high point in the middle of the day (in Winter), the Moon is at its highest high point at midnight. This means, in practical terms, that Summer “Full Moons” are always very low on the horizon, while Winter “Full Moons” can be very high overhead. Here’s a table of the altitude of the “Full Moon” when due south. Remember the times in this table don’t match the exact time of the Full Moon, but instead have been chosen as the closest in time to that instant, and so have be labelled “Full Moon” (in quotes).
* UK observers should add on one hour for BST ** The altitude here is based on my observing location in Glasgow, Scotland. You can find out how to work out how high these altitudes are here. As you can see from this table, the highest “Full Moon” due S this year occurs at 0030 on 11 December 2011, when the Moon will be over 56° above the southern horizon (approximately the height of the midsummer mid-day Sun which culminates at 57°34′). Compare this to the “Full Moon” this month, just after the eclipse, in the morning of 16 June, when the Moon barely grazes 10° above the horizon, and you can see just how low the midsummer Full Moon can be. In fact the closeness of summer “Full Moons” to the horizon means that this is an ideal time of year to try and observe the Moon Illusion.
Today, 13 June, is one of only four days in the year when the time as read on a sundial will be exactly correct.
Sundials usually tell the time using the shadow of the gnomon as cast by the Sun. This is possible as the Sun appears to move across the sky at an approximately constant speed, and so the shadow of the gnomon also moves at an approximately constant speed. The inconstancy of the Sun’s apparent motion in the sky – and therefore of the gnomon’s shadow on a sundial – is the subject of this article, and is calculated using the Equation of Time.
If you look at the shadow of a sundial’s gnomon it will fall onto a curve of numbers, along hour lines indicating local solar time. This is not equal to the official clock time until three important corrections are made:
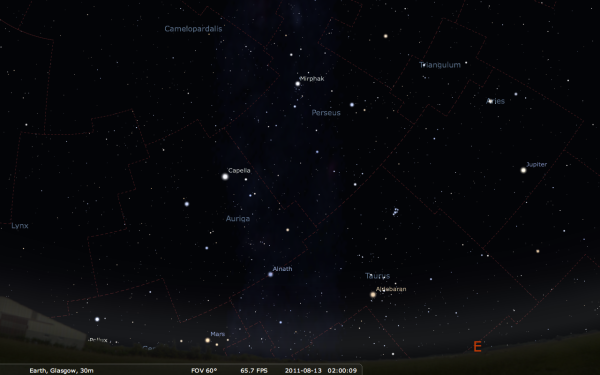
 Perseus under dark skies
 Perseus under moonlit skies


")


